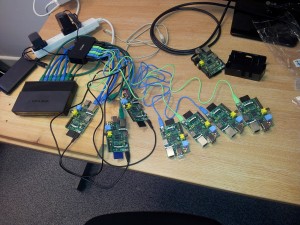
I am delighted to say that the Raspberry Pi cluster project is now fully funded to the first target of £2,500, this means that the Indiegogo fees will be 4% of the total rather than the 9% which applies to partly funded flexible campaigns. The money received by Paypal has already partially cleared, so we have been out spending some of it, here is a collection of Raspberry Pi units doing some load testing.
There are many ways to build a cluster and many decisions to take along the way, like how to power them, what SD cards to use, whether to overclock them, how to do networking, how to fix them together etc. I will try to explain some of the reasons behind what we are doing and what we tried and didn’t like so much.
Powering the Pis
The first two criteria for powering the cluster was that it must be safe, and it must look safe. These are not the same thing at all, it is quite easy to have something with bare wires all over the place that looks a bit scary, but is entirely safe. It is also possible to have it looking great, but overloading some components and generating too much heat in the wrong place and build something that is a good looking fire risk. A single large transformer was one approach, difficulties would be handling the connection from 20A cable or rail (basically like mains flex, the current decides the wire gauge, not the voltage) down to MicroUSB, most electronics components like a USB socket or stripboard are rated for 2.5A max so we would end up with chunky mains grade connectors all over the place, which looks scary, even if it is entirely safe. After a bit of experimentation we found a D-Link 7 port USB hub with a 3A power supply and decided to see how many Raspberry Pi devices we could power from it, turns out that it can do all 7, which was a bit of a surprise. We know the Pi should be able to draw 700mA for a reliable supply, but that is when it has two 100mA USB peripherals plugged into it and is running the CPU and GPU flat out. As we are not using the USB ports and we won’t be using the GPU at all, our little Pi units only draw about 400mA each. This simplifies the power setup a lot, we just need several of these high powered hubs giving us a neat, safe and safe looking setup. The power supply for the hub does get a little warm, but I have tested the current draw at the plug and we are not exceeding the rated supply.
Networking
Initially I wanted to find out if we could do it all with WiFi. This would cut out the wires, would give us a decent theoretical peak speed and could in theory be supported by a single wifi router. After testing Pi compatible Wireless N dongles the performance just wasn’t there, the max we could get was 20Mbit/sec, whilst with wired networking 74Mbit/sec was achievable. I am not sure if this was a limitation of the USB system or the drivers, but it became clear that wired networking would be significantly quicker. Having decided that wires are the way forward it came to choosing switches. One big switch or lots of little ones? Well price/performance ratio of the small home switches is just unbeatable. We settled on some TP-Link 8 port gigabit switches. Obviously the Pi would only be connecting at 100Mbit (link speed) but the uplink to the backbone switch is at gigabit speeds. Choosing the 8 port switch meant that we were going to have groups of 7 Raspberry Pi units and one port for the uplink. This approach of multiple hubs has the excellent side effect that the cluster is modular. Every shelf can run as a self-contained cluster of 7 devices networked together, we then join them together using a backbone hub to make a bigger cluster.
Physical setup
Here is the first layout attempt. It uses a 30cm x 50cm shelf, with the pi units screwed to wooden dowels pushed into holes drilled in the shelf. There are holes drilled through for the network cables, which were snipped and re-crimped on the other side.
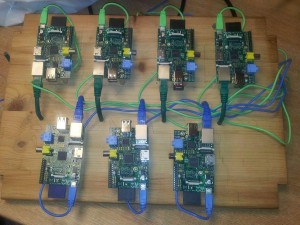
The router and power setup were screwed to the underside of the shelf. This setup was a bit fiddly to build, crimping network cables is a bit time consuming and the dowel arrangement wasn’t as neat as I wanted.
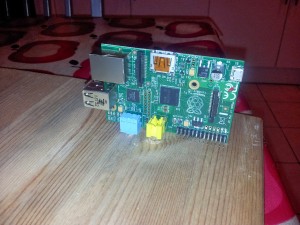
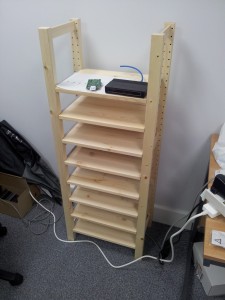
The Raspberry Pi doesn’t really have a flat available side to it, I was thinking of removing the composite video and audio out connectors to produce a flat side for fixing things to, then I noticed that if I drill some holes just the right size then the composite connection makes quite a reasonable push-fit fixing for a sideways mounted unit. Here is the shelving unit they are going to be fixed to, it is an IKEA Ivar set with 8 30×50 shelves. One design goal is to use easily available parts so that other people can replicate the design without sourcing obscure or expensive components. Wood is a great material for this kind of project, it is easy to cut, drill and fix things to, and it is a good thermal and electrical insulator – I wouldn’t want to accidentally put a Raspberry Pi down on a metal surface!
More updates will follow as the build progresses, if you have any suggestions on different approaches to any of the decisions on power/networking/fixing then do leave a comment, the design isn’t fixed in stone and we could end up changing it if a better idea comes along. Any further contributions to the campaign would also be gratefully appreciated, they will go towards filling up more shelves!